Saturday, May 11, 2002
I’m not riding the R69S enough. It’s been over a year since the last scheduled service. 13 months and I’ve only put 1200 miles on the bike. Sad. There are some extenuating circumstances:
- The bike was out of commission for a month due to some over-reving on my part
- I thought I had some transmission problems
- I bought a new bike
- I replaced a bad rocker arm assembly and installed a vibration damper
- The bike was down for another month when I replaced the chromed steel rims with alloy rims
Yeah, excuses, excuses. I promise to ride it more this year. Really. But not right now. I came back from a ride and saw the odometer was at 3585. I’m busy with other things right now, and have a 3 day ride to the California north coast next week, but will at least drain the oil while its warm. I’ll get to the rest of the stuff, later.
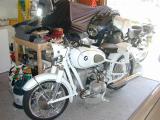
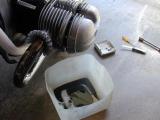
ready to drain oil while warm
The R1150RT in the background with no plastic is one of the reasons I’m busy right now. I’m installing an Autocom system (not the intercom, but the music system) and wound up pulling most of the plastic plus the tank to route wiring and get at needed places. The bike has to be back together before my trip on May 18th. Note the plastic bucket under the R69S to catch the oil.
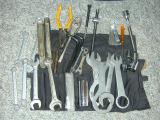
tool kit I carry on the bike
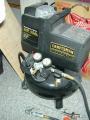
compressor
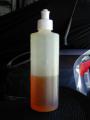
graduated squeeze bottle

supplies
Someone once asked me what tools I use. This is the toolkit that I not only carry on the bike but use for most things. I also have three torque wrenches and use two of them (10-75 ft-lbs and 25-250 in-lbs) in routine services. I may also grab a 3/8 or 1/2 inch sockets and ratchet. I’ve many of Ed Korn’s special tools for serious restoration work; they are rarely needed for normal maintenance. The other “tools” listed are an air compressor, a squeeze bottle for gear oil, a pump oiler and a bottle of WD40. The compressor is a pancake type used by contractors for nail guns. The addition of a moisture separator makes it fine for my garage use. The squeeze bottle is marked in cc and oz.

draining oil
I pulled the oil drain plug, loosened the filler plug to allow the oil to flow freely, then took this picture. The magnetic drain plug had minimal bits stuck to it. The greenish/blue stuff around the oil pan bolts in the picture is hylomar. Good stuff. No leaks. A new crush ring (I buy them 6-8 at a time) was put on the drain plug and the drain plug torqued to 15 ft-lbs. 2 quarts of BMW 10-40 were added. Why BMW oil? It is LESS than $3/qt at my dealer, so why not use it?
Thursday, May 30, 2002
The breakfast club north coast ride is over as well as memorial day weekend doings. That means I can get back to working on the R69S. This afternoon I’ll work on various things that can be done with a cold bike.
transmission oil
rear end oil
checking drive shaft oil
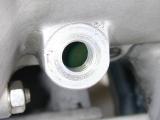
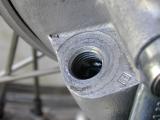
I checked the oil levels in transmission, rear end, and drive shaft. The transmission was down about 40cc. There’s no oil on the “shelf” under the flywheel. I’ll keep my eye on this. The oil in the rear end was a mm or 2 high, but this was because I accidently over filled last time I changed it. The last picture shows how I checked the drive shaft oil. The tip of the screwdriver came back with drops of oil in it – so there must be enough in the drive shaft.
air filter
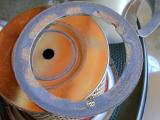
air filter gasket
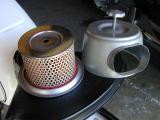
The air cleaner housing was removed and the air cleaner and gasket checked. The gasket is a bit worn. I can use it again, but better plan on having a replacement around the next time I pull the air cleaner. The air filter is fine.
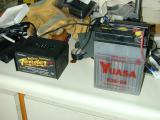
charging battery
battery tray
The battery was removed and put on the charger. I cleaned/waxed the battery tray and surrounding areas. While the wax was out I cleaned/waxed the air filter housing. Not pictured: the brake linkages were oiled, the clutch linkages oiled, and the tire air pressure checked. The front was down a couple of pounds.
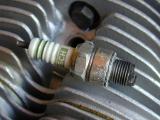
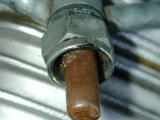
left plug

removing right plug
right plug
After blowing out the area around the plugs with air, both plugs were removed and inspected. The bike is running rich. I knew that. The plugs were cleaned and the gap checked. The right plug was perfect, the left gapped slightly wider than spec. The gap on the left plug was adjusted.
removing valve cover
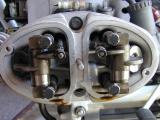
rockers and valves
The front cover was removed as were the valve covers. This time I remembered to have a catch bucket under the heads! The valves were checked first. The left side was perfect! The right side was very close to perfect, with the right exhaust maybe half a thousandth too tight.
I re-torqued the heads, verified that the left side was still perfect, them made the right side perfect, too.
That’s all the time I had this afternoon, so I reinstalled the plugs (10 ft-lbs with a light coating of anti-seize) and put the bike away. I’ll check timing tomorrow. Then I’ll work on the carbs. Wheel bearings were re-packed when I rebuilt the wheels a few hundred miles ago. The rear swing arm bearings were greased when I pulled the transmission less than 1000 miles ago.
Friday, May 31, 2002
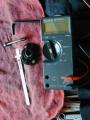
timing tools
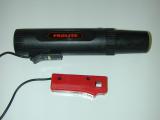
timing light
The fluke meter is used to set the static timing. It has a mode where it beeps when a circuit is closed. Makes it easy as I don’t have to keep my eyes on a meter. The timing light is powered by D cells. It is an example of why you should not buy cheep tools. It failed. More later.
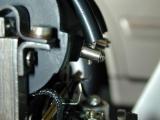
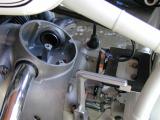
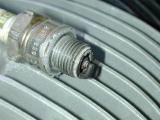
spark safety gap
rotate to TDC
I checked the safety gap an double checked that the screw terminal for the spark plug wires were tight. The motor was rotated using the generator bolt to check the points. While I was in that area the vibration damper was given a shake to ensure the rubber bits are OK.
The points were a touch tight. I adjusted them. I then checked magneto position at the S mark. Damn, it was off. Popped the rotor, re-centered the magneto body, then aligned the mark on the rotor with the notch in the points plate. The advance mechanism was re-installed and the whole thing torqued down to 14 ft-lbs. Checked the static timing. Looks good.
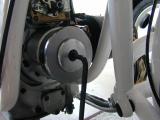
battery and aircleaner reinstalled
The battery, now fully charged, and the air cleaner were installed. I used Ed Korn’s suggestion of a touch of grease around the bottom of the air filter to keep dirt from getting through that way. The bike started (2nd kick) and the timing light showed that the S was a touch high in the window. I increased RPM to see where the F might be when the timing light cut out.
The timing light now barely works at low RPM. It doesn’t work at all off of idle. I know better than to buy cheap tools. Oh well, I think the bike is ridable. I’ll use the timing light at Joe’s, tomorrow.
One thing I noticed was a lot more black smoke than normal upon startup with a constant stream coming from the left pipe. This is getting worrisome.
Friday, Jun 7, 2002
Yeah! I finally sold my K1200 LT so there is now room in the garage to work on the /2 without bumping tender body parts against other motorcycles. Anyway, the last things to do on the 3600 mile checklist are all carburator related. I’ll start with a good carb cleaning.

carb O-ring
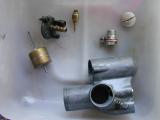
carb parts
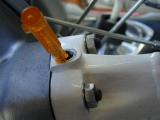
Notice the broken O-ring in the first picture. Luckily, I had a spare. The carbs were removed from the bike and cleaned (outside so I didn’t have to breath the fumes) then blown out with compressed air. The float needles were lapped to their seats while I had them appart. They look better now. I’m hoping they’ll run better.
fuel petcock filter
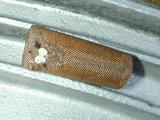
junk from the tank
After cleaning both carbs I removed the bottom of the fuel petcock to check the filter. Dirty. Carb cleaner and compressed air got the filter looking like new, again. I also sprayed cleaner and air through the fuel lines (and inline filters) to blow away anything that may have made it past the petcock filter.